Category Archives: Objects

Preservation and Exhibition: DAAP Library’s Teaching Collection & Upcoming Gallery Talk (12/5)

For the past six months, Jessica and Catarina have been working with the DAAP Library on housing their Teaching art collection, including prior acquisition and newly acquired items.  This collection consists of different art prints on paper, print plates and manuscript parchment leaves in need of long-term housing. In addition to housing, this collection is used for teaching in a classroom setting and for exhibition.

Most of the collection only requires simple matting systems, but some require more intricate matting systems such as the copper plate along with its print, a project mentioned in a previous blog post entitled How many magnets is too many magnets!?.

As some of the items of this collection were being prepared to go on exhibit, we had the opportunity to create mounts for other items, such as two parchment scrolls that were included in the exhibit. This was a fun project to work on, as it required us to create a support that would secure both scrolls, while providing an elegant solution for display.

To start, Jessica created a very rough small model with mat board, polyethylene strapping, and paper (as we always do with anything new in the lab, we do love model making!!). The model provided us the visual example that we needed to create the mount for the two scrolls.

With the model in mind, we were able to engineer a good system that would provide support for the scrolls and could be used for display. The scrolls were supported with foam rolls on the inside for the rolled ends, and secured with polyethylene strapping that only touched the foam. The sections of the scrolls that were going to be displayed were also secured with polyethylene strapping that wrapped around the mat board support through slits in the board. At the bottom, the mat board extended outwards creating a small shelf to support the end of the scroll.

A small “shelf” of mat board supports the bottom of the scrolls.

As a result of all the mounting and matting we did for the Teaching Art collection and for the scrolls, each item is currently on display at the DAAP Library entrance case:

Image of the exhibit
Current display at the DAAP Library featuring the Teaching Art Collection.
Close up of the scroll mounted on exhibit
A close-up of the scroll mounted on exhibition.

If you are interested in learning more about our preservation considerations for exhibition of this collection, Catarina and Jessica will be giving a short gallery talk on Tuesday, December 5th at 1pm, at the DAAP Library entrance on the 5th floor.

Image of the gallery talk flyer

Catarina Figueirinhas [UCL] – Assistant Conservator

How many magnets is too many magnets?!

Recently Jessica and I started working on a series of special collection items from UC Libraries’ DAAP Library. These were recent acquisitions specifically bought to be used as a teaching collection within the DAAP Library. Most items are small prints and single manuscript leaves that need to be matted for exhibition and prepared for handling during class. We have been working on these in small batches since it is a much larger collection that keeps growing.

Most of the items we have received so far have been very straightforward matting projects, however we encountered one that was puzzling and fun to work on. We received this item: a proof print accompanied by its very heavy, copper engraving plate. The print was adhered to a paper brown envelope with no information and the copper plate was also unhoused.

Image of print on the left and the copper plate on the right, with a photography target below
Proof print (left) and engraving plate (right) before treatment and housing.

The curator of the collection wanted both items to be housed together and housed in a way that would allow students to touch the items, and also be able to use them for exhibits.  We decided that both items would be matted individually, and then housed together in a thin corrugated clamshell box. The most challenging part would be to create a matting system that was strong enough to secure the very heavy copper plate and elegant enough to be used for exhibition.

The print itself received minor treatment, with the backing envelope being removed and the print housed in a polyester L-sleeve mounted with photo corners.

An image of the matted print
Print housed in a polyester L-sleeve and matted with photo corners.

With the engraving plate, I needed to figure out how to create a matting system that was strong enough to hold the copper plate in place, especially if used for an exhibit where it may be propped at a slight angle. After considering some options, I created a sink mat that would secure the plate halfway, and then the rest of the sink mat would be adhered to the window mat so the copper plate, resting on a polyester tray, could be pulled out of the mat easily. How would I keep the matting system closed? ….with magnets, lots of magnets! For this project I used 24 rare earth magnets.

Image of the matted copper plate
Copper engraving plate housed in a specialty sink mat with magnetic closures.
Diagram of the magnet locations in the sink mat
Matting system for the copper plate – a sink mat, half attached to the back mat and half attached to the window mat, all secured closed with magnets.
Copper plate partially removed from the matting system with a box highlighting the location of the polyester film tray
Copper plate slightly removed from the matting system by the polyester film tray.

This was a fun project to work on. After using 24 magnets and breaking a few in the process, the copper plate was securely housed in the sink mat, while also able to be propped up for exhibition and handled for teaching.

The matting system in action!

Catarina Figueirinhas [UCL] – Assistant Conservator

Conservation photography by Jessica Ebert

Challenge of a Millennia: How to Store an Oversized Clay Tablet?

The University of Cincinnati’s Archives and Rare Books Library owns a few cuneiform tablets that date around the 1st century BCE.  Most are small enough to fit within the palm of your hand.  However, the clay tablet in question measures 14 inches (W) by 14 inches (T) x 4.5 inches (D) and weighs roughly 40-50 lbs.

Assyrian cornerstone during surface cleaning

More accurately, it is thought to be an Assyrian cornerstone that dates between 860 and 824 BCE.  It is described in the catalog record to be from the ruins of Calah (near Ninevah) on the Tigris River.  It is likely the cornerstone of a temple or palace erected by Salmanser III, king of Assyria. The provenance of how the University acquired the tablet is uncertain.

A translation of the cuneiform writing reads, ““Salmaneser, the great king, the mighty king, king of the universe, king of Assyria, son of Asurnaserpal, the great king, the mighty king, the king of Assyria, son of Tukulbi-Ninib, king of the universe, king of Assyria, and indeed builder of the temple-tower of the city of Calah.”

After surface cleaning and digitizing the cornerstone, finding suitable storage for an Assyrian cornerstone tablet seemed like a straightforward task in the beginning.  I thought, “Let’s get it off the floor, house it, and protect it from dust!”  No problem, right?

But once we got the item back in the lab, the weight of the object combined with its fragility proved more of a challenge after Chris, Holly and I began thinking about how the object would be retrieved from storage and how it would be handled.  Rather than being stored in specialty shelving (such as items might be in a museum), this item was a library item.  We needed to fit the tablet amongst archival book shelving.  We were also faced with the prospect of transporting the cornerstone up and down a flight of stairs from the secure rare book storage. There is no easy elevator access!  And finally, once it was put in an enclosure, how would a librarian get it out to show researchers and students?

We decided on an industrial case with wheels that could be transported and stored anywhere. I knew I wanted a device with handles to pull the object in and out of the case, but immediately decided against the idea of ratchet straps. The threat of fracturing would be too great if the ratchet straps were over-tightened.

After careful thought (and the creation of mock up solutions!) the following custom design was created in five stages:

1. A waterproof, shock-proof rolling Nanuk 950 case (similar to a Pelican case) was purchased.  

2. The interior was customized with foam and supports.

3. The lid was fashioned with a Tyvek pillow screwed to the top with an interior Coroplast sheet.

4. The cornerstone was wrapped around all sides in a foam sheet with four flaps.

5. A cloth wrapper with custom handles was sewn to support the tablet during insertion into and retrieval from the case.

In addition, life-size surrogate photographs were printed by Jessica Ebert and stored in a polyester sleeve within the case.  These images may prove even more useful during exhibition or teaching than seeing the actual tablet as they were captured with raking light that beautifully highlights the cuneiform writing.  They could even be used as an alternative to handling the heavy tablet.

To help guide future librarians on how to handle the cuneiform tablet in the future, handling instructions were provided, a handling video was created, and a QR code of the video was pasted onto the case. Check out the video below.

I was appreciative to have been able to hearken back to my object’s conservation experience working at the Musical Instrument Museum. My prior experience helped guide me to dust the tablet and store surface cleaning samples, however, this was a project that took me out of my library conservation comfort zone.  The knowledge required to house such an object (and the amount of textile sewing used to create the cloth wrapper!) gave me even more appreciation for the work objects and textile conservators do to preserve our oversized and heavy materials – especially when transporting and taking them on and off display!

Ashleigh Ferguson Schieszer [CHPL] – Rare book and paper conservator

Video by Jessica Ebert

No-stick protective Mylar jacket for CD compilation

The purpose of this blog is to show a relatively easy long-term solution for strengthening and protecting the packaging for shallow banker’s box enclosures. There are two notable benefits to using this solution. The first being that in some cases little to no repairing needs to be done to damaged parts of the box and the second is at no time does any adhesive come into contact with the original piece. I have developed this system down to a science. If I make my measurements correctly, from start to finish, the lid and base jacket can be made from the custom stencils in about 180 minutes.

Ultimately you’ll be cutting 2 pieces of 4 mil Mylar to the following dimensions (W+thx4+4inches x H+thx4+4 inches) with the help of stencils.

To make a stencil I just place the lid in the center of the wastepaper and adding about 1mm all around, trace the width and height. Add 1 wall thickness all around followed by 1 wall board thickness all around then another wall thickness all around. Draw each of these added lines all the way to the edge of the paper.

Template of mylar jacket

You may notice little adaptations to the tabs that will be cut out of the Mylar. I make the tabs on opposite sides to create symmetry. Here is a close-up of one.

After scoring and cutting out the Mylar to match the pattern, fold on the lines using either a ruler and bone folder or your fingers.       

When you are all ready, place the box in the center of the Mylar sleeve and place double stick tape where the tabs will secure the corners. Start with the outside corners first.

One of the great qualities of this protective wrapper is that it can cut out repair time by the virtue of the strength of the wrapper itself.

Secure the rest of the outside, then inside corners, and we’re done!

Now it’s time to enjoy the music.

Chris Voynovich (CHPL) — Senior Conservation Technician

The Preservation Lab…in the news

Check out this new article about the work of the Preservation Lab by our collaborator Melissa Norris, with assistance from Ashleigh Schieszer, Jessica Ebert, and Kevin Grace at https://libapps.libraries.uc.edu/source/preserving-taft/.
Isn’t Preservation just so cool!

Conserving a head sculpture.

Ashleigh Schieszer works on Taft’s maquette. (Photo credit Jessica Ebert)


And for our loyal followers a bonus image of the housing of the William Howard Taft letters…
Taft letters bound

Encapsulated binding by Chris Voynovich, design by Ashleigh Schieszer (photo credit Jessica Ebert)


Polyester Encapsulated Page Binding *Part Two: The Components

This past year, the Preservation Lab was recruited to conserve the Public Library’s scrapbook of Althea Hurst.

Scrapbooks are complex library materials.  They are conduits to stories told through the use of collections of ephemeral materials (a.k.a. materials meant to be thrown away and not meant to last), such as newspaper clippings, letters and postcards, and maps.
Due to their collection of content, scrapbooks usually are bursting with problematic preservation issues.  Often, fragile pages hold stiff, brittle, or heavy parts that are adhered and folded.  Components are frequently found layered and overlapping.  These parts are filled with information and are intended to be handled and experienced; however, as the parts become fragile with age they are nearly impossible to touch without causing damage.

Before1

Althea Hurst scrapbook with adhered components, before conservation treatment. 

In most situations, it’s often best to digitize an object and protect it by storing it in an enclosure. I often recommend patrons reference the digital copy rather than handling the physical object.  Alternatively, if an object will be handled (and the importance of the object warrants conservation treatment) another solution is to support the pages by encapsulating them within clear polyester film.  The polyester film encapsulations are then bound into an encapsulated page binding.  This format help preserve the parts in the author’s intended order, however, this course of treatment must be carefully considered as it can sometimes be an invasive solution if disbinding is required.
In the case of the Public Library’s scrapbook, the scrapbook had been previously reformatted by a prior owner due to its poor condition.  At some point in the object’s history, each page and cover had been separated from the binding and stored in non-archival plastic sleeves to protect the pages from breaking.  Oversized rubber bands held the album in two manageable stacks.

Before2

Althea Hurst scrapbook as received, before conservation treatment.

When the library received the object, the pages were in dire need of stabilization before it could be digitized and also needed improved storage.  Because the scrapbook was already disbound into pieces (even the covers were detached) an encapsulated page binding was selected as the most fitting option for storage.  The local historical importance of the scrapbook warranted full treatment.

Before3

Althea Hurst scrapbook, view of inside upper cover and first page, before treatment.

Being a novice in encapsulated page bindings, I reviewed a few binding structures and wrote about my discoveries here.  I settled on constructing a modified screw-post binding to fit the needs of the Public Library’s scrapbook.
Now armed with a direction for constructing the album structure, the next challenge was:
How do I encapsulate a scrapbook that houses a variety of adhered material, such as pamphlets, postcards, letters, maps, and more, and still make the parts accessible?

Encapsulation Techniques

To determine a solution for preserving the arrangement of parts, I researched various methods of welding paper, polyester film, and spun bond sheets of polyester webbing to encapsulated pages.  I compiled the methods into a model binding for reference in preparation for treatment.

Below are a list of experimental solutions for housing and encapsulating the scrapbook’s multiple parts.   Many of the techniques were utilized in the final treatment, as you will see in the photographs below.

1. Traditional Encapsulation

  • This technique was used to fully encapsulate scrapbook pages overall, or to encapsulate removed single sheets that needed extra support
  • Pages or parts were sandwiched between polyester film and ultrasonically welded on all four sides:

traditional

  • Gaps along the corners were left to encourage air exchange and to prevent buildup of acidic off-gassing of the historic materials.

2. U-sleeve: welded on 3 sides for top edge access

  • Useful for items that may need to be handled outside of the plastic and are thick or heavy

Usleeve

Usleeve2Hinged U-sleeve allows access to the card as well as stability for storing next to the envelope.

3.  Polyester sheets welded on two parallel sides

  • Could potentially be helpful in the right circumstance for thin items that may need to be handled outside of the plastic. Two access points are helpful for reducing static cling and suction, however, items may accidentally slide out more easily (see next technique for a similar yet preferred method).

4.  L-sleeve: welded along the left side and bottom edge (in the shape of an “L”).Lsleeve

  • Alternative technique to the U-sleeve for storing parts that may require future handling.
  • An L-sleeve can be welded to one side of an encapsulated page binding with an ultrasonic weld after the L-sleeve is created.
  • For thicker materials, an additional small weld along the bottom right edge is helpful to prevent materials from sliding out of the sleeve when the page is turned.

5.  Spot welds: heat or ultrasonically welded

  • Technique used to hold materials in place and prevent them from sliding within an encapsulation

spotweld

6. Thin overlapping attachments

  • Overlapping parts that need to be kept in a specific composition can be carefully removed from the page by a conservator and individually encapsulated.  The encapsulated components can then be welded to the upper sheet of the polyester page using a variety of techniques to preserve the original orientation.
  • Using these techniques allows access to all the components on a page that would otherwise be inaccessible in a traditional encapsulation, and keeps the author’s intended composition.
  • Parts must be oriented and welded to the upper sheet of polyester before creating the finished encapsulated page, i.e. before encapsulating the lower sheet of polyester to the upper sheet.

i83079427_1015_D19N_2 i83079427_1015_D19N_1

7.  Hollytex hinge

  • A strong synthetic hinge (made from spun-bonded polyester) that is welded to the clear polyester sheets with ultrasonic welding.
  • Useful for easily viewing the front and back of  overlapping parts or loose bits.

Detail of Hinge

hollytex

Overlapping Components, Before Treatment:

THE PRESERVATION LAB: A collaboration between the University of Cincinnati and the Public Library of Cincinnati and Hamilton County Object Institution & Library: PLCH CALL #: 977.178092 ffH966Zh 1938 SUBJECT: Althea Hurst scrapbook, 1938 - documents the journey of four Cincinnati school teachers - took a trip to Canada, Nortern Europe, Germany, Eastern Europe, and France. Scrapbook filled with photographs, brochures, notes and other ephemera. DATABASE ID: 1015 ITEM #: i83079427 TREATMENT ID: LIGHTING: EcoSmart 27-Watt (100W) Full Spectrum Craft CFL Fluorescent with sock diffusers FILTER(s): none COMMENTS: CREATOR: Jessica Ebert WEBSITE: thepreservationlab.org

Hinged Overlapping Parts, After Treatment:
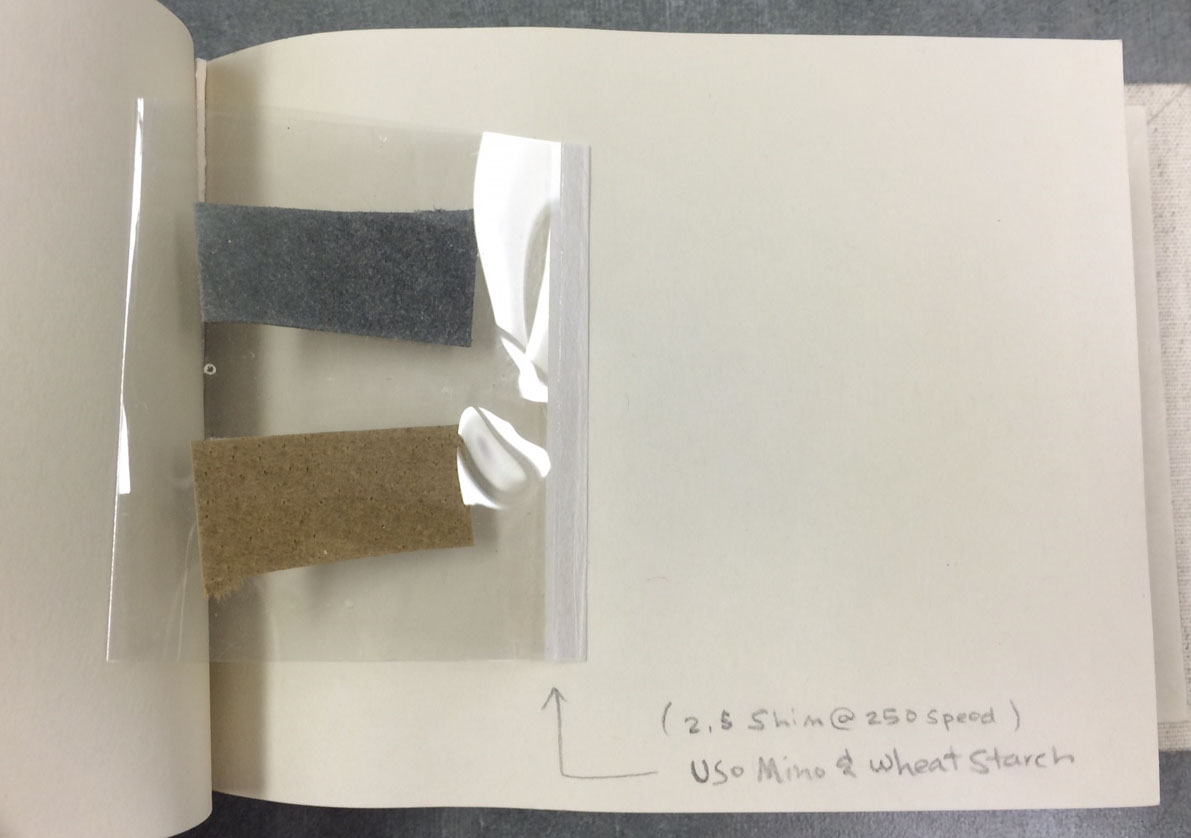
THE PRESERVATION LAB: A collaboration between the University of Cincinnati and the Public Library of Cincinnati and Hamilton County Object Institution & Library: PLCH CALL #: 977.178092 ffH966Zh 1938 SUBJECT: Althea Hurst scrapbook, 1938 - documents the journey of four Cincinnati school teachers - took a trip to Canada, Nortern Europe, Germany, Eastern Europe, and France. Scrapbook filled with photographs, brochures, notes and other ephemera. DATABASE ID: 1015 ITEM #: i83079427 TREATMENT ID: LIGHTING: EcoSmart 27-Watt (100W) Full Spectrum Craft CFL Fluorescent with sock diffusers FILTER(s): none COMMENTS: CREATOR: Jessica Ebert WEBSITE: thepreservationlab.org

8. Paper Hinge

paper hinge_1     paper hinge2_1

  • Usu Mino tissue is welded in between two sheets of polyester
  • The extended Usu Mino hinge can then be brushed with paste and adhered directly to a paper leaf.
  • Useful in other applications, for example preserving loose components in paper textblocks, such as pressed flowers or handwritten notes.

9. Polyester four flap attachment

  • For small but thick objects
  • To secure thin components with multiple parts on top of an encapsulated page while still allowing full access

i83079427_1015_D14N_2_2

10. Paper spacers

  • Strips of acid free paper can be placed within an encapsulation to prevent smaller components from moving within larger encapsulated pages.
  • The paper space holders are visually pleasing so the viewer is not distracted by the page below.
  • Static holds thinner sheets in place
  • Thicker textblock leaves may need to be spot welded in-between the document and the paper strip

paperSpacer

11. Stiff support leaf with cloth hinge

  • To support heavy page encapsulations AND/OR include heavy components in pockets on a strong page within the binding
  • Constructed out of 2-ply mat board, PVA, and Canapetta cloth

Before Treatment:

THE PRESERVATION LAB: A collaboration between the University of Cincinnati and the Public Library of Cincinnati and Hamilton County Object Institution & Library: PLCH CALL #: 977.178092 ffH966Zh 1938 SUBJECT: Althea Hurst scrapbook, 1938 - documents the journey of four Cincinnati school teachers - took a trip to Canada, Nortern Europe, Germany, Eastern Europe, and France. Scrapbook filled with photographs, brochures, notes and other ephemera. DATABASE ID: 1015 ITEM #: i83079427 TREATMENT ID: LIGHTING: EcoSmart 27-Watt (100W) Full Spectrum Craft CFL Fluorescent with sock diffusers FILTER(s): none COMMENTS: CREATOR: Jessica Ebert WEBSITE: thepreservationlab.orgAfter Treatment:

THE PRESERVATION LAB: A collaboration between the University of Cincinnati and the Public Library of Cincinnati and Hamilton County Object Institution & Library: PLCH CALL #: 977.178092 ffH966Zh 1938 SUBJECT: Althea Hurst scrapbook, 1938 - documents the journey of four Cincinnati school teachers - took a trip to Canada, Nortern Europe, Germany, Eastern Europe, and France. Scrapbook filled with photographs, brochures, notes and other ephemera. DATABASE ID: 1015 ITEM #: i83079427 TREATMENT ID: LIGHTING: EcoSmart 27-Watt (100W) Full Spectrum Craft CFL Fluorescent with sock diffusers FILTER(s): none COMMENTS: CREATOR: Jessica Ebert WEBSITE: thepreservationlab.org

12. Stiff flyleaf to support encapsulated pages when laying open

  • Constructed out of 4-ply mat board, PVA, and Canapetta cloth
  • The stiff flyleaf contains a smaller hinge than the interior support leaves

THE PRESERVATION LAB: A collaboration between the University of Cincinnati and the Public Library of Cincinnati and Hamilton County Object Institution & Library: PLCH CALL #: 977.178092 ffH966Zh 1938 SUBJECT: Althea Hurst scrapbook, 1938 - documents the journey of four Cincinnati school teachers - took a trip to Canada, Nortern Europe, Germany, Eastern Europe, and France. Scrapbook filled with photographs, brochures, notes and other ephemera. DATABASE ID: 1015 ITEM #: i83079427 TREATMENT ID: LIGHTING: EcoSmart 27-Watt (100W) Full Spectrum Craft CFL Fluorescent with sock diffusers FILTER(s): none COMMENTS: CREATOR: Jessica Ebert WEBSITE: thepreservationlab.org
*Bonus Experimental Technique:

13. Welding polyester film to Vivak

  • Even the cover contained an attached component!
  • As per a request by the curator, the original cover was incorporated into the new binding with reversible methods.  The original cover was hinged into a sink-mat package that was sandwiched between a cloth covered mat and a sheet of Vivak.
  • After a bit of experimenting, a polyester L-sleeve was ultrasonically welded to the Vivak “pastedown” so the original arrangement could be preserved

Before Treatment & After Treatment:

i83079427_1015_A04N i83079427_1015_D04N_pastedown

  • A flyleaf of polyester film was hinged onto the “pastedown” to protect the attached component from being abraded by the edges of the textblock leaves:

IMG_1149
Two volumes, after treatment:
IMG_1147_1
Final challenge: how to manage the scrapbook’s large treatment effectively and efficiently.

To read about our collaborative treatment workflow, please see the next upcoming installment: Polyester Encapsulated Page Binding *Part Three: The Workflow.

Ashleigh Ferguson Schieszer (PLCH) — Conservator, Conservation Lab Manager
Photographic Documentation – Jessica Ebert (UCL) – Conservation Technician

Nineteenth Century Buddhist Religious Treatise

Palm leaf manuscriptIn August of this year, the Lab received a Palm leaf book from Archives and Rare Books library during one of our usual monthly meetings. This item was brought to the Lab to receive a new enclosure for a better long-term preservation storage and easier access. Along with a new enclosure, the Lab was asked to create two surrogates of one of the original Palm Leaves for classroom use.  Under the direction of Ashleigh Schieszer, lab conservator, technician Chris Voynovich constructed the housing working closely with Catarina Figuierinhas who created the surrogate leaves.
Palm leaf

Creating Surrogates

In order to create an accurate surrogate of one of the Palm leaves, the Palm leaf book was taken to the University of Cincinnati Digitization Lab to be photographed with a PhaseOne Reprographic System. This system includes 60 MP PhaseOne digital back, DT RCam with electronic shutter, Schneider 72 mm lens, and a motorized copy stand. At the digitization Lab, one of the Palm leaves was digitized, recto and verso. The collaboration between labs allows the Preservation Lab to obtain a great quality image of a Palm leaf to print a high quality surrogate.
i37044734_1197_dig01ni37044734_1197_dig02n
Once the Preservation Lab received an image with enough quality to work with, the process of creating a surrogate started.
In order to create a surrogate, it is important to have in mind several different aspects such as the purpose of the surrogate and the physical characteristics of the original object (texture, thickness and colors). When thinking about the purpose of the surrogate one has to answer questions such as: Is the surrogate going to be displayed or handled?  If so, how?  Behind a glass case? Will it need a presentation enclosure?
In this case, the purpose was for the librarian to be able to show a “real” palm leaf page without having to actually handle the original fragile leaves.  Also, having a surrogate of a palm leaf would allow patrons and scholars to handle a replica of an original object without having to unwrap and open the book.
Our goal was to create two surrogates; one in color, true to the original Palm leaf page; and _dsc1362another black and white, allowing the writing to be read easier.
Since we wanted to create a surrogate as identical as possible to the original, it was necessary to study the original object’s texture and thickness, as well as consider specific details such as gilt edges or punched holes.
The first step was to select several papers to test for printing.  Selected papers had a similar texture and thickness to the original Palm Leaf and/or were selected because they contained a handy ICC profile.
Once the papers were chosen for texture, thickness and color profiling, the image obtained from the Digitization Lab was enhanced in Adobe Photoshop CC 2015 and several surrogate samples were printed using a P7000 Epson Printer pigmented ink jet printer.

Middle holes were punched with a Japanese hole punch.

Middle holes were punched with a Japanese hole punch.


Surprisingly, papers containing ICC profiles did not necessarily produce a more accurate color representation.
Finally, after several trials and errors, a different paper was chosen for each surrogate. The colored surrogate was printed on an archival UltraSmooth Fine Art Epson paper.  The black and white surrogate was printed on an acid-free Curtis Brightwater Artesian white smooth paper.
Edges of the colored surrogate were pained with iridescent gold acrylic paint.

Edges of the colored surrogate were pained with iridescent gold acrylic paint.


Once the surrogates were printed and cut to the exact dimensions, the final finishing touches were made. On both surrogates, the middle holes were punctured in the same fashion as the original palm leaf.  For the colored surrogate, the edges were colored with an iridescent gold Golden High flow Acrylic.  Once the surrogates were complete, the process of constructing an enclosure for both the surrogates and the original object began.


Constructing a new enclosure

I’ve heard the joy should not be in the finished product but in the process. I have to say I agree with that theory. I love receiving a challenge like this and pounding out a solution. This particular enclosure had many facets which turned out to be exciting as well as rewarding to problem solve together with lab staff.
plam-leaf-3
Using a structure engineered by our lab conservator, first, I created a double-sided sink mat with two open windows to display both sides of the two surrogates.  Rare earth magnets were introduced as fasteners to hold the objects secure inside each mat. The surrogates are supported and viewable through a Vivak and polyester transparent L-sleeve, which is removable.   The Vivak and polyester sleeve was welded together on the lab’s Minter ultrasonic welder.
i37044734_1197_d05n_surrogate_packing_1
Volara supports were constructed to cradle the book so the gilding would not touch any abrasive surfaces, and so there would be a support for the cover once opened. The surrogates help provide information to patrons without causing wear and tear on the fragile book through handling. Originally, we considered storing the surrogates in a tray below or above the book to conserve shelf space, however by arranging the mats next to the object, they could immediately be on display when the enclosure is opened.  I am pleased with the outcome.  It is now possible to enjoy all the parts of this amazing work within the enclosure itself while minimizing the opportunity for damage, as well as providing a “wow!” factor.
i37044734_1197_d02n_packing_1i37044734_1197_d03n_packing_1

Final enclosure with the original palm leaf book and surrogates.

Catarina Figueirinhas (UCL) — Senior Conservation Technician

Ashleigh Schieszer (PLCH) — Book and Paper Conservator

Chris Voynovich (PLCH) — Conservation Technician

Photo credit:  Jessica Ebert (UCL) — Conservation Technician


We love artists' books: the finished boxes!

You may recall that back in July I blogged about these two beauties that came to the Lab for custom enclosures.  They both returned to PLCH at the beginning of September in their custom enclosures, so I thought I’d share what type of enclosures we came up with to address all the fragile elements of these particular artists’ books. Continue reading

We love artists' books!

While all the books, documents, and objects that we receive in the lab are interesting and exciting, artists’ books are definitely a crowd favorite, especially amongst the technicians. When Holly and Ashleigh come back from the PLCH rare books meeting and announce they’ve brought back some artists’ book we all get a little excited and know that there are probably some fun cloth covered clamshell boxes in our future. Last week when the techs met with Ashleigh, our conservator, to discuss upcoming projects there was quite a bit of oohing and ahhing when she unwrapped and assembled the two artists’ book they had brought back to the Lab for enclosures.
Continue reading